 Previous
Index Next
ISCS version 0.1.1
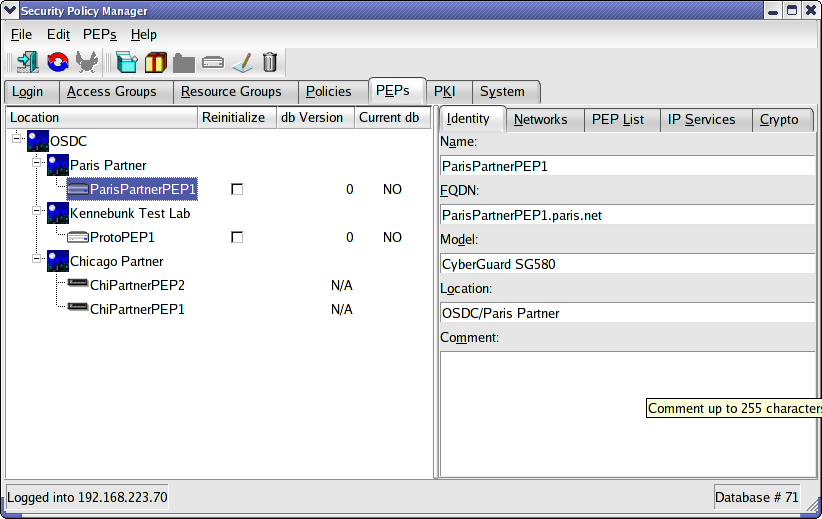
Our first step is to define any gateways or, in ISCS terminology, PEPs (Policy Enforcement Points). Figure 1 shows completed PEP. There are two basic types of PEPs, viz., managed and unmanaged. ISCS exercises administrative control over a managed PEP. It has no control over an unmanaged PEP but uses the information to establish connectivity to the unmanaged PEP and its protected networks and to create policies with Accessors and Resources protected by the unmanaged PEP.
Unmanaged PEPs allow an ISCS security domain to interoperate with other networks. It also allows deployment of ISCS enabled devices in legacy networks to bring much of the ISCS functionality to the network without requiring a replacement of all devices.
Managed and unmanaged PEPs are visually distinguished by different icons and by the information and options which are available. In the figure below, ParisPartnerPEP1 and ProtoPEP1 are both managed PEPs. ChiPartnerPEP1 and ChiPartnerPEP2 are unmanaged. Managed PEPs display the database version on the PEP and whether this database version is the current database version. They also have an option to force reinitialization. This will force the PEPs configuration files to be overwritten with the latest versions and the services administered by ISCS to be restarted. Managed PEPs merely show that the database version is not applicable.

Figure
1
So how do we get there? We start by creating a Location. At this point, Locations are only logical groupings with no functionality. Eventually, they will be used to describe packet flow between security devices at a location. Click on the New Location button or choose New Location from the PEP menu or right click on the Location column and choose New Location from the context menu. Enter the name of the new Location and any comment.

Figure
2
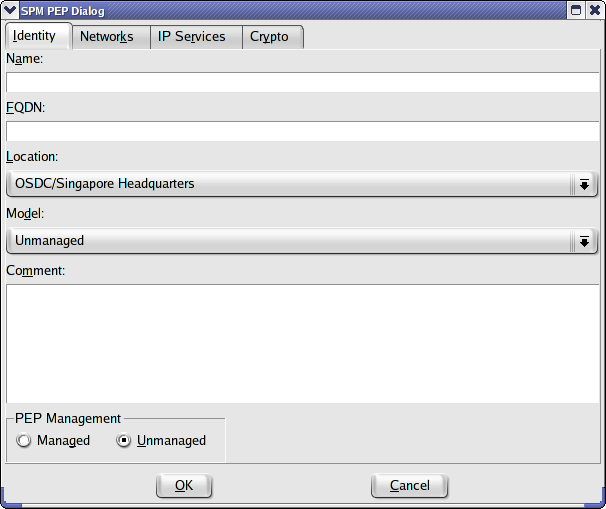
Now we will create a PEP at the new location. Right click on the location and choose New PEP or choose New PEP from the PEP menu or click on the New PEP button. PEP configuration is one of the more labor intensive activities of ISCS and thus the four tabs of configuration.

Figure
3
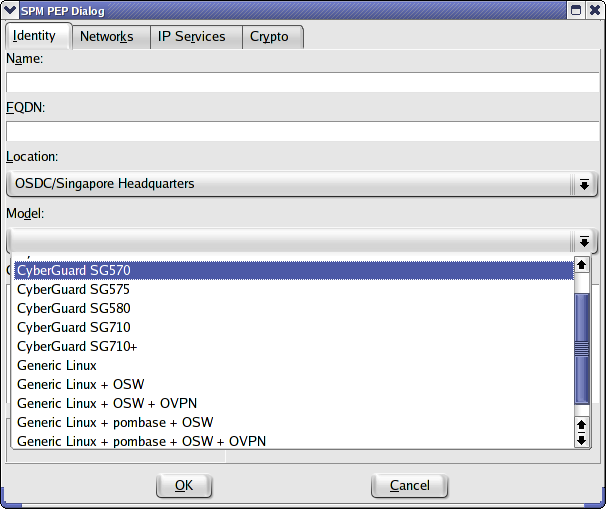
The model must be selected before one can leave the Identity tab since it will determine some of the options on the other tabs.
ISCS version 0.1.1 has defined a handful of models and can use most of them. The Generic Linux options beg some explanation. The -2.4 and -2.6 designations refer to the kernel level. If you have a generic Linux-2.4 devices, you must have installed a *SWAN (e.g., openswan, StrongSWAN) IPSec stack (swan). If you installed the iptables patch-o-matic patches suggested in the PEP Installation - Generic Linux page or your installation includes them by default, choose "Generic Linux-2.4 + pombase + swan" otherwise choose "Generic Linux-2.4 + swan". The Linux-2.6 devices should include all the old patch-o-matic patches hence pombase is not an option. The Linux 2.6 kernel has slightly more complicated VPN options. It ships with a native IPSec stack (netkey). One can use the racoon IKE tools for keying or install the openswan/strongswan userland tools for keying. If one wants to override the netkey IPSec stack and use the old openswan/strongswan KLIPS stack (which include the ipsecX interfaces), one must apply the KLIPS patch separately. Thus, on the Linux 2.6 devices, "swan" refers to the keying mechanism (technically Pluto) and does not include KLIPS (the ipsecX interfaces). Choose the appropriate option. If your installation includes OpenVPN, choose the appropriate option with OVPN.
ISCS supports the higher level models of the Secure Computing (SnapGear) SG series.
The only model option for an unmanaged PEP is unmanaged. This will be automatically set if the Unmanaged radio button is toggled on.

Figure
4
The Networks tab, shown in figure 4, is the most complicated. It is divided into three tables. The top is to define public directly connected networks. These would typically use the interfaces connected to the Internet or WAN (yes, ISCS finally allows us to impose some kind of security on our WANs to create multi-layered defenses). The middle table defines private interfaces and the networks directly connected to them. The bottom table defines indirectly connected private networks, i.e., those separated from the PEP by an internal router. We'll discuss each field starting with the Public Interfaces table.

Figure
5
New networks can be added by right clicking on the empty space of a table or pressing the insert key. Clicking the Interface button brings up the Interface configuration screen. This can currently only be used to define the interface name but will ultimately provide a powerful configuration utility for layer 1 and layer 2 PEP configuration.

Figure
6
There is no need to define Security Associations in order to create VPNs in ISCS. They are created automatically when one enables the VPN on the network. VPN is typically not enabled on a PEP's public interfaces. The PEP is usually accessed on the VPN by its internal addresses. One fills in the IP address, Netmask and default gateway. The enable RAS check box is to control VPN client access, e.g., Road Warrior access. Again, this is not usually enabled on the public interfaces. Anti-Spoofing and Fragment Dropping are controlled by the remaining check boxes.
There are even more options for private interfaces. The first four fields are the same as for the public interfaces. The PublicIF combobox determines which public interface will be used to access the VPN. This provides some rudimentary load balancing on a PEP with multiple public interfaces. Enable RAS is the same as for public interfaces. The next three columns pertain to Network Address Port Translation - a common means to give internal users with private addresses access to the Internet. The first column enables or disables the feature, the second specifies the public IP address(es) to use for NAPT and the third the public interface to use. If you choose default values, the interface and address will automatically adjust to each other. If you change the default values, the system will assume you are an expert and not automatically synchronize the columns. This allows for some exotic configurations of NAPT.
The next three columns pertain to Internal NAT and bear some special explanation. The principle use for this feature is when one is confronted with conflicting IP address space, i.e., two subnets are using the same address. The Internal NAT feature allows you to translate an entire network to a different address by simply enabling the feature and specifying the new address. The new address can be used remotely (for networks behind other PEPs), locally (for addresses connected directly or indirectly to this PEP) or both. The feature is only available if the PEP model supports it.
Enable Client VPN Clients is for those situations where you want to use IPSec clients on your internal network for enhanced security. AntiSpoof and Drop Fragments are the same as for the public interfaces.
The Routes table defines the indirectly connected networks. Most of the fields are the same as for the Private Interfaces table with a few exceptions. The interface field is populated with all the public and private interfaces. Leaving it to default will auto-populate it with the value appropriate to the IP address you enter. The IP address for the Private and Public Interface tables was the address of the Interface. The IP address for the Routes table is the address for the network. The Gateway is the address of the router used to access the network from the PEP and the Metric is the hop count to get there. There is no Drop Fragment checkbox because dropping fragments is a function of the interface and not the network.
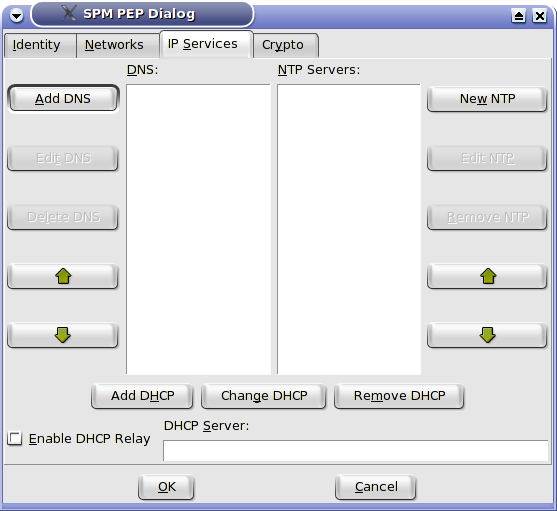
The IP Services tab is used to define DNS and NTP servers. The arrows are used to change the order.

Figure
7
This ISCS version finally allows for the deletion and editing of PEPs and PEP networks however all the related tasks have not been automated. Accessors are not automatically changed to account for new or deleted addresses and must be changed manually. Resources will not automatically be readdressed and, in fact, will be deleted if their network is deleted or edited and they have no addresses on the remaining networks. Therefore, if one wishes to edit a network, it is best to create a new network, readdress any servers or resources and then delete the old network.